


Menu
Sustainbility Personalised bespoke Gift for men and women
Style Advice - Boxer Shorts Men
Style Advice Shirts and Poverty
Style Advice - Bivolino Shirt Quality
Style Advice - Size Guide
STYLE ADVICE COLLARS AND CUFFS SHIRTS AND BLOUSES
Style Advice Cufflinks
Shirt Advice Purchase - Online Shirtmaker
Style Advice Tie A Tie
Men Shirt Fatherday Gift
Style Advice Bow Tie - How to tie a Bow Tie?
Men Shirt Valentine Gift
Style Advice - Shirt Colors
STYLE ADVICE FABRICS SHIRTS AND BLOUSES
Traveling Tailor - Workshops, network and incentive Events – Corporate Benefit
MEN SHIRTS AND BLOUSES
Face masks Covid-19 Coronavirus
Fabric that resists stains and perspiration- INDUO
Personalised bespoke Gift for men and women
Style Advice - Boxer Shorts Men
Style Advice Shirts and Poverty
Style Advice - Bivolino Shirt Quality
Style Advice - Size Guide
STYLE ADVICE COLLARS AND CUFFS SHIRTS AND BLOUSES
Style Advice Cufflinks
Shirt Advice Purchase - Online Shirtmaker
Style Advice Tie A Tie
Men Shirt Fatherday Gift
Style Advice Bow Tie - How to tie a Bow Tie?
Men Shirt Valentine Gift
Style Advice - Shirt Colors
STYLE ADVICE FABRICS SHIRTS AND BLOUSES
Traveling Tailor - Workshops, network and incentive Events – Corporate Benefit
MEN SHIRTS AND BLOUSES
Face masks Covid-19 Coronavirus
Fabric that resists stains and perspiration- INDUO
Style Advice Tie A Tie
Shop ties online
A
necktie
, or simply a tie, is a long piece of cloth, worn usually by men, for decorative purposes around the neck, resting under the shirt collar and knotted at the throat.Variants include
the ascot tie, bow tie, bolo tie, zipper tie, cravat and clip-on tie
. The modern necktie, ascot, and bow tie are descended from the cravat. Neck ties are generally unsized, but may be available in a longer size. In some cultures men and boys wear neckties as part of regularoffice attire
or formal wear. Some women wear them as well but usually not as often as men. Neckties can also be worn as part of a uniform (e.g. military, school, waitstaff), whereas some choose to wear them as everyday clothing attire. Neckties are traditionally worn with the top shirt button fastened, and the tie knot resting between the collar points.Four Methods: Four-in-Hand Knot (Easiest Method), Pratt Knot (Basic Formal Knot), Half Windsor Knot (Formal) and Traditional Windsor knot (Extra Formal)
Have you graduated beyond the clip-on tie ? Beginning with these helpful instructions, a sharp-looking tie, a mirror, and some patience, you can become an expert in tying your own fashionable knot. You have several options available, from the versatile Four-in-Hand Knot H5 to the classic Windsor.
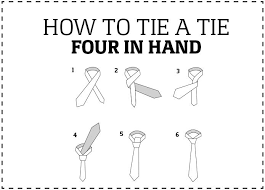
Four-in-Hand Knot (Easiest Method)
· Drape the tie around your neck. With your collar up and your shirt fully buttoned, place the tie around your shoulders. Hang the wider end of the tie on your right side, with the narrow end about 12 inches (30 cm) higher on the left. Avoid spread collars with this small, asymmetric knot.
· Cross the wide end over the narrow end. Bring the wide end to the left side of your body, over the narrow end. Hold the two pieces of cloth together with your left hand, near your neck.
· Loop the wide end under the narrow end. Let go with your right hand. Tuck it underneath the narrow end, grab the wide end, and pull it back through to your right side.
· Loop the wide end back over again. Cross it over the narrow end one more time, at the same point where your left hand is holding the knot together. The front of the tie should be facing forward again (so the seam is hidden).
· Pull the wide end up through the neck loop. Fold the tip of the wide end under itself and pull up through the neck loop.
· Insert the wide end down through the front knot. You should have a horizontal knot across the front of your tie. Hold this knot open with your finger and carefully insert the wide end.
· Tighten the knot. Hold the narrow end and slide the front knot up to tighten the tie a tie. Make sure your tie is straight and the length is appropriate, ideally ending at the top of your belt buckle.
Squeeze the sides of the knot gently to create a dimple just below it.
The four-in-hand knot is a little asymmetrical at the neck. Don't worry about this; it is normal.
· Place the tie upside down around your collar. Unlike most knots, the Pratt knot begins with the tie upside down, so the seam of the tie is facing forward. Hang the wide end of the tie over your right side, and the narrow end over your left side. This medium size knot suits most collars and builds.
· Check the position of the wide end. In a knotted tie, the wide end should just graze the top of your belt buckle.[5] At the start, however, raise or lower the wide end until it hangs 1–2 inches (2.5–5 cm) below this point. As a rule of thumb, the Pratt knot will lift the wide end by this distance as you tie the knot.The narrow end of the tie should be higher than the wide end. It will usually be around belly button level, but this is less important than the wide end's placement.
· Cross the wide end under the narrow end. Move the wide end across your body to the left side, placing it underneath the narrow end.
- Do not move the narrow end of the tie a tie for any part of this knot. Just hold it steady while you use the wide end.
· Bring the wide end up to the loop around the neck. Place the tip on top of the loop, still on your left side.
· Pull the wide end through the neck loop. Insert the wide end down into the loop from above. Pull it through in the same direction it lay before, on the left.
· Fold the wide end over the narrow end, from left to right. This flips the wide end so the seam is no longer visible. The wide end will extend at an angle off to your right.
· Pull the wide end up through the neck loop. Bring the wide end up to your neck loop again, but this time from below. Pull it through.
· Tuck the wide end down through the new loop at the front. Your last fold created a horizontal loop at the front of your tie. Tuck the wide end through this loop, and pull straight down to tighten. The wide end should now rest in front of the narrow end.
· Slide the knot to adjust. Pull down on the wide end to tighten. Slide the front knot up to the base of your collar to fasten the tie. To create a dimple just below the front knot, squeeze the sides of the knot gently as you tighten
· Position the wide end on the right side. Place the tie around your neck and let the sides hang in front of you. The wide end should be on the right side of your body, and hang roughly 12 inches (30 cm) lower than the narrow end on the left. The Half Windsor is a triangular, symmetrical knot suitable for formal occasions. Larger than the Four-in-hand but less bulky than the Windsor, this can work with most neckties and collar types. Neckties made from thicker fabric will likely require a spread or wide spread collar with this knot.
· Cross the wide end over the narrow end. Bring the wide end of the tie over to your left side, crossing over the narrow end.
· Fold the wide end back under the narrow end. Complete a loop around the narrow end and pull the wide end back to the right side. The underside of the wide end should be visible at this point.
· Take the wide end up to the neck loop. Raise the wide end up to the loop of necktie at your collar. Keep it on the right side.
· Pull the wide end through the loop and to the left. Insert the wide tip down through the loop and pull it through from the left side, so it crosses under the narrow end.
· Fold the wide end over the front of the narrow end. Bring the wide end back across the front and onto your right side.
· Slide the wide end up through the neck loop. Fold the wide end up through the neck loop a second time.
· Insert the wide end down through the front knot. Loosen the front knot with your finger and insert the wide end. Pull it through to rest over the narrow end.
· Pull on the wide end to tighten. Gently squeeze the front knot as you pull to slide the knot up and create a dimple at the front of your tie.
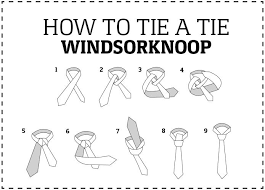
· Put the tie around your neck. Make sure the wider end is on the right, and about 14 inches (36 cm) lower than the thinner side on the left.The Windsor knot uses a lot of cloth, so the lower end should start a bit lower than you would usually position a tie. Many consider the large, symmetric Windsor knot the most elegant and formal option. Wear it with a spread or wide spread collar.
· Cross the wide end over the narrow end. Hold one end in each hand, then pass each of them to the opposite hand. The wide end should now be on your left side.
· Bring the wide end up through the neck loop. Using your right hand, hold the two ends where they cross near your collar. With your left hand, pull the wide end up through the neck loop from below.
· Fold it end behind the narrow end. Grab the wide end with your right hand and pull it back to the right side of your body, under the narrow end. Hold the knot near your collar in place with your left hand.
· Pull the wide end through the neck loop. Insert the tip of the wide end and pull through, still on the right side. The underside of the wide end should now be facing forward.
· Fold the wide end over the narrow end. Fold it back over from right to left, so the front side is visible again.
· Pull the wide end through the neck loop from below. Bring the wide end back up through the neck loop one last time.
· Insert the wide end through the front knot. Place the wide end through the horizontal knot at the front of the tie. Pull it through.
· Tighten the knot. Hold the base of the front knot and squeeze gently from the sides. Slowly pull the wide end of the tie to bring the knot closer to the neck.

From the accessories collection https://www.bivolino.com/en/accessories-ties
Please enter your name and email address