


Menu
Sustainbility Personalised bespoke Gift for men and women
Style Advice - Boxer Shorts Men
Style Advice Shirts and Poverty
Style Advice - Bivolino Shirt Quality
Style Advice - Size Guide
STYLE ADVICE COLLARS AND CUFFS SHIRTS AND BLOUSES
Style Advice Cufflinks
Shirt Advice Purchase - Online Shirtmaker
Style Advice Tie A Tie
Men Shirt Fatherday Gift
Style Advice Bow Tie - How to tie a Bow Tie?
Men Shirt Valentine Gift
Style Advice - Shirt Colors
STYLE ADVICE FABRICS SHIRTS AND BLOUSES
Traveling Tailor - Workshops, network and incentive Events – Corporate Benefit
MEN SHIRTS AND BLOUSES
Face masks Covid-19 Coronavirus
Fabric that resists stains and perspiration- INDUO
Personalised bespoke Gift for men and women
Style Advice - Boxer Shorts Men
Style Advice Shirts and Poverty
Style Advice - Bivolino Shirt Quality
Style Advice - Size Guide
STYLE ADVICE COLLARS AND CUFFS SHIRTS AND BLOUSES
Style Advice Cufflinks
Shirt Advice Purchase - Online Shirtmaker
Style Advice Tie A Tie
Men Shirt Fatherday Gift
Style Advice Bow Tie - How to tie a Bow Tie?
Men Shirt Valentine Gift
Style Advice - Shirt Colors
STYLE ADVICE FABRICS SHIRTS AND BLOUSES
Traveling Tailor - Workshops, network and incentive Events – Corporate Benefit
MEN SHIRTS AND BLOUSES
Face masks Covid-19 Coronavirus
Fabric that resists stains and perspiration- INDUO
Shirts Ironing men's Shirts
NON IRON SHIRTS
All day wrinkle-free performance, made with a safe and innovative treatment, in your custom size. Whether you're working a nine-to-five or are pulling an all-nighter, these non-iron shirts will keep you looking sharp at every turn. Starting from a special cotton fabric made exclusively for Bivolino, we cut and sew the shirt before applying the non-iron treatment to the finished shirt. This allows for a cleaner overall finish, a stronger wrinkle-free performance, a softer hand feel, and almost no shrinkage. Whether you have your shirts pressed at the cleaner, or prefer to do it yourself at home, caring for our non-iron shirts is a breeze. If you like to put your shirts in the washer and dryer, you'll love how these come out looking — just toss the shirt on and be on your way. Or, for a totally clean look, just give the shirt a quick press. Clean, Fused Seams.The seams on our non-iron shirts use a special fusible interlining that gives them a pucker-free look. On a normal shirt, you'll notice little wrinkles around the seam that get more visible over time, so we take this extra step of fusing the yoke, armhole, side seams, and plackets on these shirts to make sure it looks incredibly clean every time you wear it.
Non-iron shirts have long been associated with cheap synthetic blends and worrisome concentrations of a chemical known as Formaldehyde. Until now.Thanks to advances in technology, we're now able to produce 100% cotton non-iron shirts that are virtually formaldehyde-free. Why do we say “virtually”? Our non-iron shirts have less than 35 parts per million of formaldehyde, which is almost undetectable. Today, a formaldehyde concentration of 100 parts per million on fabric is considered low and safe. Bivolino non-iron shirts are an order of magnitude improvement from the non-iron shirts available 10 years ago, and simply the best available today in a custom fit.
Wrinkle Resistant vs Non Iron Dress Shirts
What’s the difference in wrinkle resistance between non-iron and wrinkle-resistant dress shirts?
Non-Iron treated shirts are going to have superior wrinkle resisting performance compared to
wrinkle-resistant shirts
. Wrinkle-resistant fabrics definitely need to be ironed or pressed after they are washed for a clean, professional appearance. The treatment is such that your shirts stay looking more crisp throughout the day than they otherwise would, were they not treated. Non-Iron shirts, on the other hand, require little-to-no ironing following a wash at home to achieve a flawless appearance. If you have your non-iron shirts washed and pressed at the cleaners, even better.Other factors that determine
wrinkle-resistance
: one shouldn’t forget that the underlying fabric weave, weight, and cotton quality play a very important role in overall wrinkle resistance.Generally, thinner fabrics made with single ply construction will wrinkle more easily than 2-ply fabrics with a bit more body. Broadcloth (also known as poplin) wrinkles most easily of the fabric weaves, so if you really care about having a shirt that’s easy to maintain we suggest going for a twill, pinpoint, or royal oxford. High thread count fabrics (120’s-170’s) tend to be slightly more fragile and prone to wrinkling than many fabrics, so we find the best natural wrinkle resistance will come with fabrics made in 80’s or 100’s 2-ply construction.Durable press finishing of cotton fabrics: An overview
Durable press (DP) or easy care finishing
is almost always used for cotton fabrics or textiles with a high content of cellulosic fibers. This finish provides resistance against shrinkage and improved wet and dry wrinkle recovery to cellulosic textiles. Inhibition of easy movement of the cellulose chains by crosslinking with resins/polymers is the mechanism of a DP finish. Initially, derivatives of urea such as urea-formaldehyde and melamine-formaldehyde resins were used. Environmental concerns and the potential danger of formaldehyde led to the introduction of formaldehyde-free finishes. Among them, polycarboxylic acids such as 1,2,3,4-butanetetracarboxylic acids and citric acids are the most promising chemicals. To enhance the flexibility, tensile strength and whiteness of the easy care finished textiles, novel finishing agents have been recently considered; for example, ionic crosslinking, polyamino carboxylic acids and non-ionic poly- urethane, as well as employing nano-materials as the catalyst or co-catalyst. The possible application of the easy care treatment with other functional finishes, mainly antimicrobial, flame retardancy and water–oil repellency, has been also been focused upon. A wide variety of cottonliquid ammonia finishing
is available. Non-ironing liquid ammonia finish on cotton shirting fabric.Ironing a Men’s Dress Shirt | 7 Steps to Iron A Dress Shirt
If you wish to be a well turned out man, learning how to iron your own dress shirts is of utmost importance. Sure, some say that steaming a shirt produces acceptable results-but nothing beats the crisp pressing that only a hot iron can provide.
How Ironing Works?
Ironing loosens chemical bonds. In other words, it changes the molecules of the polymers in the material for a short time, allowing the fibers to be straightened. This is accomplished by both the heat the iron creates and the weight of its soleplate (the underside of the iron). Once the fabric cools, the fibers hold the new straightened shape.
Preparing to Iron a Dress Shirt
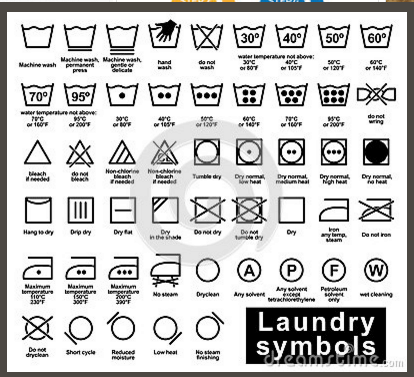
Before putting heat to material get to your know dress shirt’s fabric. Refer to the care tag that’s often located inside the collar. Those symbols may be strange at first, but they aren’t meant to be gobbly-gook. First, notice the iron (or iron with steam) symbol. This lets you know if the shirt can be ironed in the first place. Don’t try it if there’s an ‘X’ through it. Next, look for the dots-often through the center of the iron icon.
- One dot means the shirt is synthetic. Keep the heat on the lower settings (around 175 to 230 degrees).
- Two dots symbolize a shirt made of silk or wool. These require the medium heat settings (250 to 300 degrees).
- Three dots are for linen or cotton shirts. These fabrics need the 320-400 degree temperatures to look sharp. These materials are also the only ones that should receive steam, unless there is an ‘X’ through the steam symbol.
How to Iron a Dress Shirt?
- Before starting, use a freshly laundered shirt. If using a dryer, remove the shirt as soon as the buzzer sounds so that wrinkles don’t form. Another method that works well is to iron a damp dress shirt. This allows the shirt to steam and dry at the same time.
- Step One: Iron the back of the collar first. Work from the points toward the center. There’s often a bit of extra material in the collar to let it stretch, so this method keeps creases from forming.
- Step Two: Flatten the cuff of the sleeve on the ironing board. Regardless of whether you wear Button cuffs or French cuffs, pressing these first makes it easier to work with the rest of the sleeve.
- Step Three: Next work on the sleeves. This is one of the trickier parts of the shirt, especially when learning how to iron. Start by laying the seam of the sleeve flat across the ironing board. Using your hands spread the material out, then use the iron. Use the tip of the iron near the cuff and work back toward the shoulder. If a crease down the arm is desired, press the edge of the sleeve.
- Step Four: Now work on the back of the dress shirt. Take your time around the pleat on the back. I find it easier to iron the underside first, then work on the pleat itself. Afterward, transition to the shoulders. Place the narrow end of the ironing board into the sleeve. This will allow a flat place across the yoke (upper shoulder) portion of the shirt.
- Step Five: Iron the button row. Use the point of the soleplate between each button. Work gently so that the thread holding each button in place doesn’t get damaged. Placing the tip of a spoon over the button may help protect it.
- Step Six: Now, flip the shirt over and work on the front. If there is a pocket, iron from the sides to the center like with the collar to avoid creasing.
- Step Seven: Lastly, work on the front of the collar. Once again iron from the points to the center.
HOW TO FOLD A DRESS SHIRT?
Traditional Dress-Shirt Fold
To easily fold a dress shirt, start by turning it face-down. Fold one-third of the body on the right side towards the center, then fold the sleeve in the opposite direction, lining it up with the edge of the shirt. Repeat on the left, then fold the body vertically into three even squares.
- Button the top button and the third button.
- Lay the shirt face-down on the folding surface. You should be looking at the back of your shirt.
- Smooth out any puckers or wrinkles, so the shirt is flat front and back.
- Fold the right side first. Fold about one-third of the body toward the center of the shirt. The fold line starts at the center of the shoulder and ends at the tail. You should see the back of your shirt with about one-third of the front folded to the back.
- Neatly fold the sleeve forward, creating an angled fold at the shoulder. The sleeve should line up with the edge of the first body fold.
- Fold the left side in the same manner.
- Make a fold of several inches of the shirt tail.
· Fold up the bottom half of the partially folded shirt. The tail should be just behind the collar of the shirt now.
· Turn the entire shirt over. You should have a neatly folded shirt as you typically see at a professional laundry or clothing store.
Keeping Away Wrinkles
- Use the permanent press cycle. This dryer cycle will allow your clothes to cool while they are still moving, preventing wrinkles from forming. Clothes are most likely to wrinkle while they are warm, so cooling them when they can't form wrinkles is best.
- Always starch your shirts before folding. If you really want to keep your shirts from wrinkling after you fold them, starch and iron your shirts before folding.
Don't pack shirts too tightly. When you put away folded shirts, don't pack them in too tightly. This is more likely to wrinkle them.
From the collection https://www.bivolino.com/en/men-shirts-non-iron
From the collection https://www.bivolino.com/en/women-blouses-non-iron
Please enter your name and email address